3 UART Serial Communication using STM32 HAL
3.1 Objective:
By the end of this exercise, students will:
- Understand the basics of UART communication.
- Configure UART using STM32 HAL in CubeIDE using CubeMX for the STM Nucleo-144 F767ZI board.
- Transmit and receive data over
USART3(It will be set to Asynchronous mode). - Implement simple communication between the STM32 microcontroller and a serial terminal on a PC.
3.2 Materials:
- STM Nucleo-144 F767ZI development board.
- USB to TTL Serial converter (or onboard ST-LINK USB).
- CubeIDE installed on the PC.
- Serial terminal software (e.g., PuTTY, Tera Term, or the serial monitor in CubeIDE).
3.3 Viewing UART Output
The output from the UART can be seen in two ways.
Using a Command Shell Console
Using Terminal Extension
To install the terminal extensions in CubeIDE follow the steps here.CautionCaution: While following the aboe tutorial to install built-in terminal, in the “Work with” text box(a box that has the text “type or select site”), select “Eclipse Repository” and DO NOT select “all available sites” this may cause the IDE to stop responding.
Identifying the port
The Serial port name will be usually like COM 3 or COM 9 in windows and /dev/ttyACM0 in linux.
In Windows, press Win+x and then m to open the device manager (or search from the start button). In the ports pheripheral you can find the port used by STM32.
3.4 CubeMX Configuration:
1. Create a New Project:
- Launch CubeIDE and create a new project.
- Select STM Nucleo-144 F767ZI board (or the the STM32F767ZI microcontroller).
2. Enable USART3 Peripheral:
- In the Pinout & Configuration tab, enable
USART3(can be found under connectivity category) and set mode to Asynchronous (This will be already there if you have chosen the default peripheral configurations). - Assign the appropriate pins for TX (PD8) and RX (PD9) for USART3.
3. UART Configuration:
- Set Baud Rate to 9600.
- Configure 8 data bits, No parity, and 1 stop bit.
- Enable both Transmit and Receive.
4. Enable NVIC Settings (Optional for USART3 Interrupts):
- If using interrupts, enable USART3 global interrupt.
5. TIM7 Configuration (Optional for Timer Interrupts)
- Enable TIM7 (can be found under timer category) (or any other available timer).
- Configure the timer with a prescaler and period to generate an interrupt every 1 second.
- In the Parameter Settings, set the following configuration.
- Prescaler - 48000-1
- Counter Mode - Up
- Counter Period - 2000-1
- \[\begin{align*}\text{Interrupt Interval} &= \frac{(\text{Counter Period}+1)\times(\text{Prescaler}+1)}{\text{Clock Source Frequency}}\\ &=\frac{2000 \times 48000}{96\times10^6}=1 \text{s}\end{align*}\]
- In the NVIC Settings, enable the TIM7 global interrupt.
We are selecting TIM7 for timer as it is one of the basic timers. It uses the APB1 timer clock source as the clock source (Refer this block diagram and this section).
The frequency of the APB1 timer clock can be verified using the Clock Configuration tab.
6. Generate Code:
- Save the
.iocfile usingCTRL + sand you will be prompted to generate code. You can make this the default choice. You can generate code manually by using Project > Generate Code to create the project with the configured settings.
3.5 Explanation of Key Functions:
Explanations of these functions can be found in the UM1850
- HAL_UART_Transmit
- This function sends data through the UART peripheral.
- Syntax:
HAL_UART_Transmit(&huart3, data, length, timeout);- Example:
uint8_t msg[] = "Hello, UART!"; HAL_UART_Transmit(&huart3, msg, sizeof(msg)-1, HAL_MAX_DELAY); // Transmit the message - HAL_UART_Receive
- This function receives data through the UART peripheral.
- Syntax:
HAL_UART_Receive(&huart3, buffer, length, timeout);- Example:
uint8_t rxBuffer[10]; HAL_UART_Receive(&huart3, rxBuffer, 10, HAL_MAX_DELAY); // Receive data - HAL_UART_Receive_IT
- This function enables interrupt-based data reception.
- It allows the microcontroller to handle data asynchronously.
- Syntax:
HAL_UART_Receive_IT(&huart3, buffer, length); - HAL_TIM_Base_Start_IT
- Used to start a timer in interrupt mode, which can be useful for periodic actions like transmitting data every second.
- Example:
HAL_TIM_Base_Start_IT(&htim7); // Start timer 7 in interrupt mode - HAL_TIM_PeriodElapsedCallback
- This function is called when a timer interrupt occurs.
- It can be used to perform tasks at specific intervals, such as sending a string over UART.
- HAL_UART_RxCpltCallback
- This function is called when an interrupt based reception is completed.
- It can be used to perform tasks after a certain bytes of data is recieved over UART.
3.6 Tasks and Sample IO Behavior:
Task 1: Simple UART Communication
- Transmit a string (“Hello, UART!”) from the STM32 to the PC serial terminal via USART3.
Code Example:
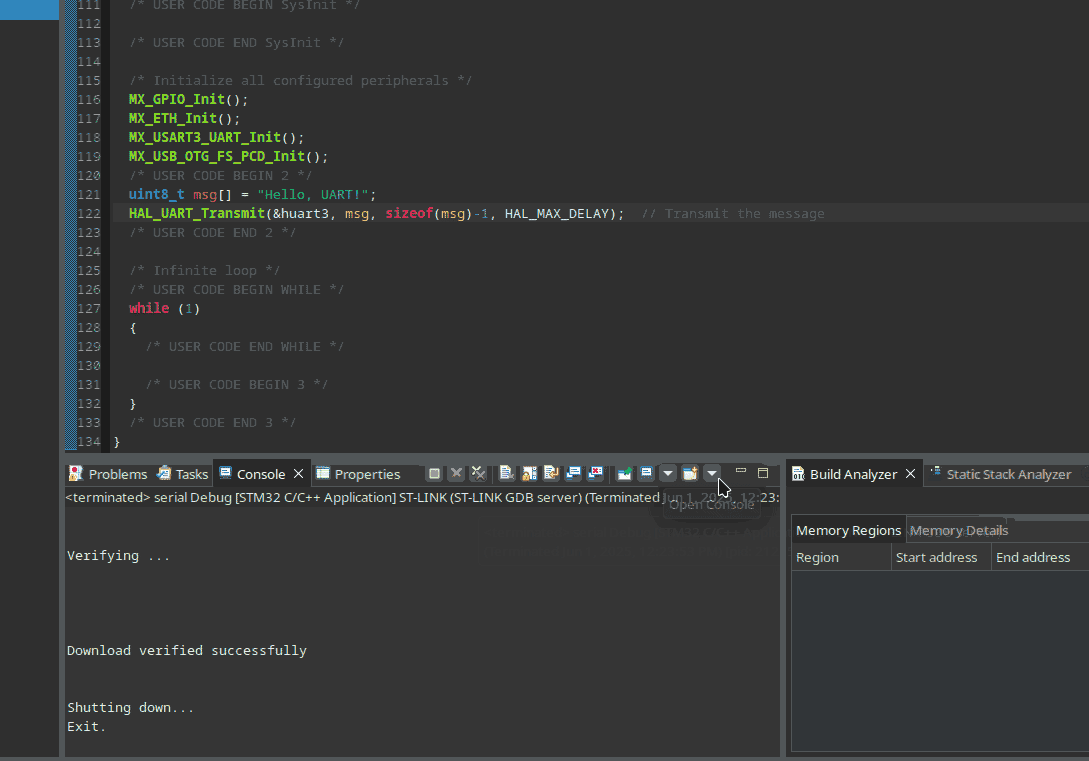
void main(void){

  /* USER CODE BEGIN 2 */

  uint8_t msg[] = "Hello, UART!";
  HAL_UART_Transmit(&huart3, msg, sizeof(msg)-1, HAL_MAX_DELAY);  // Transmit the message

  /* USER CODE END 2 */

}
USER CODE BEGIN 2
uint8_t msg[] = "Hello, UART!";
HAL_UART_Transmit(&huart3, msg, sizeof(msg)-1, HAL_MAX_DELAY);  // Transmit the message
Sample IO:
- Output: The string “Hello, UART!” appears in the serial terminal on the PC.
Task 2: Implement a Loopback Test
- Modify the code so that the STM32 receives data from the serial terminal and echoes it back.
Code Example:
int main(void) {
  /* USER CODE BEGIN 1 */
  uint8_t rxBuffer[5];  // Buffer to store received data
    // Try changing the buffer size
  /* USER CODE END 1 */

  /* USER CODE BEGIN WHILE */
  while (1) {
    // Receive data from the serial terminal
    HAL_UART_Receive(&huart3, rxBuffer, sizeof(rxBuffer), HAL_MAX_DELAY);

    // Echo the received data back to the terminal
    HAL_UART_Transmit(&huart3, rxBuffer, sizeof(rxBuffer), HAL_MAX_DELAY);

    /* USER CODE END WHILE */

    /* USER CODE BEGIN 3 */
  }
  /* USER CODE END 3 */
}
USER CODE BEGIN 1
uint8_t rxBuffer[5];  // Buffer to store received data
// Try changing the buffer size
USER CODE BEGIN WHILE
// Receive data from the serial terminal
HAL_UART_Receive(&huart3, rxBuffer, sizeof(rxBuffer), HAL_MAX_DELAY);

// Echo the received data back to the terminal
HAL_UART_Transmit(&huart3, rxBuffer, sizeof(rxBuffer), HAL_MAX_DELAY);
Sample IO:
- Input: If you type “STM32” in the serial terminal.
- Output: “STM32” is echoed back to the terminal.
Task 3: Send a String Every 1 Second Using Timer Interrupt
- Use a timer interrupt to send a string (“STM32 Timer Test n”) every 1 second.
- TIM
Code Example:
/* USER CODE BEGIN PV */
volatile uint64_t counter = 0; // to keep track of the number of times printed
/* USER CODE END PV */

int main(void) {

  /* USER CODE BEGIN 2 */
  // Start timer in interrupt mode
  HAL_TIM_Base_Start_IT(&htim7);
  /* USER CODE END 2 */

}

/* USER CODE BEGIN 4 */
// Timer interrupt callback function
void HAL_TIM_PeriodElapsedCallback(TIM_HandleTypeDef *htim) {
    if (htim->Instance == TIM7) {
        // Send message every second
        uint8_t msg[50];
        uint8_t n_bytes = sprintf(msg,"STM32 Timer Test %lu \n\r", counter);
        HAL_UART_Transmit(&huart3, msg, n_bytes, HAL_MAX_DELAY);
        counter++;
    }
}
/* USER CODE END 4 */
USER CODE BEGIN PV
volatile uint64_t counter = 0; // to keep track of the number of times printedUSER CODE BEGIN 2
// Start timer in interrupt mode
HAL_TIM_Base_Start_IT(&htim7);
USER CODE BEGIN 4
// Timer interrupt callback function
void HAL_TIM_PeriodElapsedCallback(TIM_HandleTypeDef *htim) {
    if (htim->Instance == TIM7) {
        // Send message every second
        uint8_t msg[50];
        uint8_t n_bytes = sprintf(msg,"STM32 Timer Test %lu \n\r", counter);
        HAL_UART_Transmit(&huart3, msg, n_bytes, HAL_MAX_DELAY);
        counter++;
    }
}
Sample IO:
- Output: The string “STM32 Timer Test” is sent to the serial terminal every second.
Task 4: Interrupt-Based UART Communication
- Configure UART communication using interrupts to receive and echo data asynchronously.
Code Example:
/* USER CODE BEGIN PV */

uint8_t rxBuffer[1];  // Buffer to store received data
// Try changing the buffer size

/* USER CODE END PV */


void main(void){

  /* USER CODE BEGIN 2 */

  // Start interrupt-based reception
  HAL_UART_Receive_IT(&huart3, rxBuffer, 1);

  /* USER CODE END 2 */
}


/* USER CODE BEGIN 4 */
// Interrupt callback function
void HAL_UART_RxCpltCallback(UART_HandleTypeDef *huart) {
    if (huart->Instance == USART3) {
        // Echo received data
        HAL_UART_Transmit(&huart3, rxBuffer, 1, HAL_MAX_DELAY);

        // Restart reception
        HAL_UART_Receive_IT(&huart3, rxBuffer, 1);
    }
}
/* USER CODE END 4 */
USER CODE BEGIN PV
uint8_t rxBuffer[1];  // Buffer to store received data
// Try changing the buffer size
USER CODE BEGIN 2
// Start interrupt-based reception
HAL_UART_Receive_IT(&huart3, rxBuffer, 1);
USER CODE BEGIN 4
// Interrupt callback function
void HAL_UART_RxCpltCallback(UART_HandleTypeDef *huart) {
    if (huart->Instance == USART3) {
        // Echo received data
        HAL_UART_Transmit(&huart3, rxBuffer, 1, HAL_MAX_DELAY);

        // Restart reception
        HAL_UART_Receive_IT(&huart3, rxBuffer, 1);
    }
}
Sample IO:
- Input: Type “STM32” in the serial terminal.
- Output: Each character is echoed back immediately, as data is received and transmitted using interrupts.
3.7 Conclusion:
In this exercise, you explored USART serial communication on the STM Nucleo-144 F767ZI board using STM32 HAL in CubeIDE. We covered two primary communication methods: polling and interrupts.
- Polling was demonstrated using functions like
HAL_UART_TransmitandHAL_UART_Receive, where the microcontroller continuously checks for data transmission or reception. While simple to implement, polling can block the CPU, preventing it from executing other tasks while waiting for the communication to complete. - Interrupts, on the other hand, were introduced as a more efficient method of handling USART communication. In interrupt-based communication, the CPU can perform other tasks while waiting for data. When data is ready, an interrupt is triggered, and the appropriate callback function handles the data. This method enhances system performance and responsiveness, especially in real-time applications.
By implementing both approaches, you gained a clear understanding of how to manage serial communication effectively in embedded systems, choosing between polling and interrupts depending on system requirements. These concepts are crucial for building efficient, responsive applications in embedded environments.